ODYSSEY INSTRUCTION MANUAL Section 1
INTRODUCTION
![]() The Odyssey System® of lamp shade construction makes the process of building a Tiffany lamp as simple and straight-forward as possible. You will be working on the outside of a 360° fiberglass mold, using an adhesive wax to hold the glass pieces in place on the mold. Other lamp systems require you to fit, foil and solder small groups of pieces at a time, which means you must commit yourself before you see how the whole lamp looks and fits together. In the Odyssey System®, all the glass pieces are cut before any of them are joined together on the mold. This allows you to review the color work of your complete lamp to see how it all works together, and make any necessary changes without having to take the lamp apart. Additionally, during fitting, the holding power and flexibility of the wax allows you to trim, re-cut or move pieces around on the mold at will until you are satisfied that everything fits perfectly. Our system takes all the guesswork out of building a lamp, saving you a good deal of time and aggravation.
The Odyssey System® of lamp shade construction makes the process of building a Tiffany lamp as simple and straight-forward as possible. You will be working on the outside of a 360° fiberglass mold, using an adhesive wax to hold the glass pieces in place on the mold. Other lamp systems require you to fit, foil and solder small groups of pieces at a time, which means you must commit yourself before you see how the whole lamp looks and fits together. In the Odyssey System®, all the glass pieces are cut before any of them are joined together on the mold. This allows you to review the color work of your complete lamp to see how it all works together, and make any necessary changes without having to take the lamp apart. Additionally, during fitting, the holding power and flexibility of the wax allows you to trim, re-cut or move pieces around on the mold at will until you are satisfied that everything fits perfectly. Our system takes all the guesswork out of building a lamp, saving you a good deal of time and aggravation.
![]() This instruction manual is a long one, we know, but we think it is more important to provide you with all of the information you might need, than it is to avoid intimidating you. There are too many simplistic instruction manuals out there that don't really answer your questions. Be patient. We think we have made this one understandable as well as comprehensive.
This instruction manual is a long one, we know, but we think it is more important to provide you with all of the information you might need, than it is to avoid intimidating you. There are too many simplistic instruction manuals out there that don't really answer your questions. Be patient. We think we have made this one understandable as well as comprehensive.
![]() This Odyssey manual is not intended to be an instruction manual on basic stained glass techniques. It is assumed that you already have some proficiency in glass cutting, copper-foiling and
This Odyssey manual is not intended to be an instruction manual on basic stained glass techniques. It is assumed that you already have some proficiency in glass cutting, copper-foiling and
soldering. If this is your first copper-foiled lamp project, it is strongly advised that you do it under the supervision of an experienced stained glass instructor. We also advise that your first lamp be a fairly simple one of less than 400 pieces. Save your dream lamp for your second or third project.
![]() On the other hand, we do not pretend to have the last word in building a lamp. If you already use techniques that differ from the ones outlined here, and they work for you, by all means use them. If they don't, try it the way we recommend.
On the other hand, we do not pretend to have the last word in building a lamp. If you already use techniques that differ from the ones outlined here, and they work for you, by all means use them. If they don't, try it the way we recommend.
![]() This instruction manual is designed around the use of the Odyssey ring and rim. Although you can save a little money by resorting to a vase cap and copper wire, we recommend that you use the Odyssey hardware. It is identical to that employed by Tiffany Studios and is designed to give your lamp strength in the areas where it is needed most, as well as producing that authentic "Tiffany look." You will be spending many enjoyable hours building your lampshade and it will be a source of pride and pleasure for years to come. We honestly don't think it makes good sense to skimp on the hardware.
This instruction manual is designed around the use of the Odyssey ring and rim. Although you can save a little money by resorting to a vase cap and copper wire, we recommend that you use the Odyssey hardware. It is identical to that employed by Tiffany Studios and is designed to give your lamp strength in the areas where it is needed most, as well as producing that authentic "Tiffany look." You will be spending many enjoyable hours building your lampshade and it will be a source of pride and pleasure for years to come. We honestly don't think it makes good sense to skimp on the hardware.
![]() Before actually beginning to use the procedures that follow, read through the rest of this instruction manual to give yourself an overview of the entire Odyssey process. You'll do a better job at each step in the process, if you already have some idea of what you are going to be doing next.
Before actually beginning to use the procedures that follow, read through the rest of this instruction manual to give yourself an overview of the entire Odyssey process. You'll do a better job at each step in the process, if you already have some idea of what you are going to be doing next.
I. THE PATTERNS
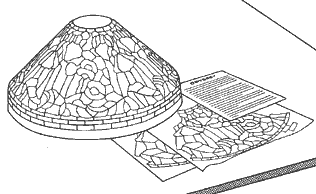
In your Odyssey kit, you will find two pattern sheets, one Mylar and the other paper. The Mylar pattern will be cut apart into pattern pieces and the paper sheet saved as a reference copy, so that the individual Mylar pattern pieces can be quickly identified and located. Note that the pattern pieces often bear a letter and/or arrow as well as a number. The letter will help you identify what that piece is supposed to represent, (i.e., flower petal, leaf, border row, etc.) as shown in the "SYMBOLS" index on your pattern sheet. The arrow is included as an indication that shading or grain direction in the glass may need to be taken into consideration. For example, flowers such as dogwoods or pansies will look more natural if there is a consistent color or shading change in the petals
The Odyssey Mold Kit
A "Colored-up" Pattern

where they meet in the center. Also, daffodil leaves look best when done in a streaky green glass, but look strange when the streaks don't run in the direction of the leaf. The arrow will help to remind you of the orientation of a pattern piece whose shape is ambiguous.
It is a good idea to color your paper pattern with colored pencils so, when cutting, you can quickly identify what all of the shapes represent. Before doing this, however, take some time to study the pattern and decide how all of the shapes would appear in real life. Note where one leaf
overlaps another; where a flower appears to be viewed from an angle instead of straight-on; or where a long stem is bisected by an overlapping leaf. Keep in mind that the letter identifications shown on your pattern are not an absolute rule. They are only one solution to the resolution of shapes. The shape or position of most pieces make what they are supposed to represent obvious; a flower, leaf, etc. Others, however, are more ambiguous. It is sometimes difficult to decide what they are meant to be. One piece might be seen as either a flower or a leaf or background, depending on how you look at it. Even original Tiffany lamps are often inconsistent in this way. A specific pattern piece was sometimes colored by Tiffany's artist as a flower on one repeat, as a leaf on the second, and as background on the third! There are no absolute rules. You are the artist now. The way you see it is the correct way. The important point here is to arrive at a mental picture of what you are trying to represent, and use the qualities of the glass to make that picture come alive in your lamp.
Keep this in mind when coloring your pattern. Shade your flowers the way you want to shade the glass. Make that leaf a little darker where it tucks under the one in front of it. Note where two pieces are sections of the same stem, and color them the same. On your pattern, indicate that a certain
Cutting the Mylar Pattern Apart
piece could either be a flower or a leaf by cross-hatching it green in one direction and red in the other. A little time spent forming a clear picture in the beginning can really make a difference in your finished lamp.
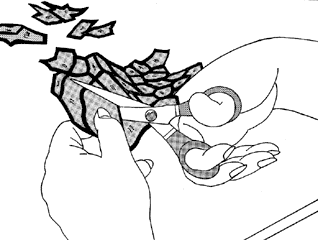
The pattern sheet you will cut apart is made of Mylar, a tough plastic material that is waterproof and resistant to wear. You can use your Odyssey pattern pieces directly on a wet grinder. The pattern is laid out on the sheet, so that if you were to cut down the center of all the black lines and lay the resultant pieces out on your form, they would leave no space in between. If you were to cut along the edges of the black line on your Odyssey pattern, you would give yourself a fairly liberal
foiling allowance. In theory, the width of the blackline that is left after the pattern pieces are cut out will be the same as the distance between pieces when they are in place on the lamp mold. In practice, however, flashing, bumps and sloppy cutting (which none of us are ever guilty of!) often takes up a lot of this gap. As a general rule, small piece patterns should be given less of a foiling allowance than those with bigger pieces. If you are unsure about how much of an allowance to give yourself, do a test by photocopying a section of your pattern, and then cutting out about a dozen adjacent pattern pieces, using the edges of the black line to cut along. Copy these in glass and see how they fit on the mold. (You should have less than 1/32" average gap between pieces, with 1/64" being ideal.) Based on this test, you can then make the necessary adjustments when you cut out your Mylar pattern. Double-cutting pattern shears are not recommended on patterns with small intricate curves as they tend to bind, leaving jagged edges. Use a sharp pair of good quality utility scissors, together with some patience. It is also a good idea to save the leftover Mylar for cutting extra patterns later if you happen to lose one, or need to create your own shape.
As the pattern pieces are cut out, some system of organized storage is useful to facilitate finding specific pattern pieces when you need them. Most
people prefer to lay their pattern pieces out on a copy of the pattern, which works fine for any designs with fairly large pieces. For more intricate designs, this system is not practical (for example, if you happen to sneeze in the wrong direction) unless some means is found to secure the loose pieces to the pattern. One veteran Odyssey teacher offers this suggestion. First glue the pattern down on a rigid surface, like 1/8" masonite, then cover it with clear Contac paper (or wide cellophane tape) to protect the pattern. Each individual pattern piece is then held on the surface with a dot from a glue stick (non-drying, please).
II. THE MOLD
Your Odyssey mold is designed for years of dependable service. The durable fiberglass construction makes it impervious to water, heat, acidic fluxes or organic solvents. You can even lay a hot soldering iron down on the mold without damaging it at all. It can also be drilled, filed or sanded to adapt it to your particular method of assembly.
Features:
![]() The pattern lines of the design are permanently engraved into the surface of the mold. The simple grouting operation that makes them visible can be easily repeated if they should
The pattern lines of the design are permanently engraved into the surface of the mold. The simple grouting operation that makes them visible can be easily repeated if they should
Inserting a Plywood Basal Disk
ever wear off. Unlike the printed lines of other mold systems, ours will be good for the life of the mold.
![]() The recessed area in the top of the mold is designed to receive an Odyssey aperture ring, and to insure that it is centered, level, and positioned in the shade at the proper depth. If the shade design has a flat lower edge, your Odyssey mold will also have a narrow ledge at the bottom to insure that the lower edge (rim) will be straight and level.
The recessed area in the top of the mold is designed to receive an Odyssey aperture ring, and to insure that it is centered, level, and positioned in the shade at the proper depth. If the shade design has a flat lower edge, your Odyssey mold will also have a narrow ledge at the bottom to insure that the lower edge (rim) will be straight and level.
Mounting:
If you plan to use a lamp jig to support your mold, you will need to do some preliminary modifications in order to mount the mold. Do not secure the mold at the aperture as this can cause
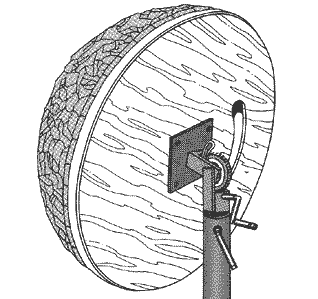
A Homemade Heavy-duty Lamp Stand
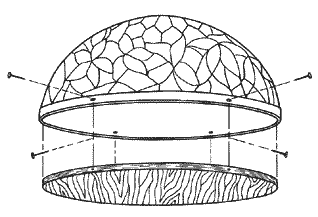
the mold undue stress, particularly when inclined on its side during soldering operations. Mount it by means of a wooden disk installed in the bottom of the mold. Cut a disk out of 1/2" to 3/4" plywood that will fit snugly inside the bottom of the mold. Temporarily secure the disk by placing the mold over it on a level surface and drilling 3 or 4 small holes through the fiberglass into the wooden disk.
Insert nails into each of these holes, so that when the mold is turned upside down the plywood disk will remain in position. The disk should be glued to
the mold rather than being secured by screws or nails as these will force the mold out of round if there is any gap between the two. We recommend using fiberglass resin as a glue because it sets up quickly and will provide a permanent bond to the fiber glass mold. Before gluing, fill any gaps between the disk and fiberglass with strips of cloth to retain the resin. Then wrap a piece of masking tape around the entire bottom edge of the mold so that most of the width of the tape hangs out over the edge. This will act as a dam to prevent resin from dripping onto the outside of the mold and getting into the engraved lines. Due to the thinness of the liquid resin, the first application may not completely fill up the gap between the plywood and the mold, forming only a film across the gap in some places. Allow the resin to set before applying a second coat, which should fill the gap all the way around. When this final coat has setup, remove the nails and sand off any excess resin. A pipe flange can then be screwed into the center of the wooden plate and this, in turn, used to adapt to your lamp stand.
Grouting:
The lines engraved into the mold are permanent, but are difficult to see and need to be filled with colored grout to bring them out. Odyssey's "Mold Mud" is especially formulated
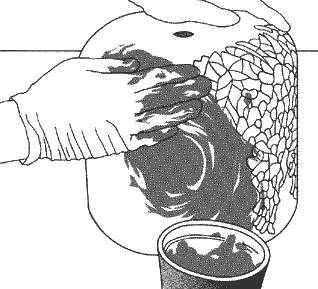
Grouting the Mold
for this purpose, but a serviceable grout mixture can also be made from the following:
GROUT
 3 tsp. powdered tile grout (without sand)
 1/2 tsp. powdered black tile grout pigment
 1/2 tsp. white glue (Elmer's, Wilhold, etc.)
 Approx. 3 tsp. water
If you make up your own grout, use only tile grout pigment as other pigments may tend to bleed and not clean up as well. You will want the above mixture to have the consistency of thick soup, so start by mixing in only 2 teaspoons of water, and then add more until the consistency is
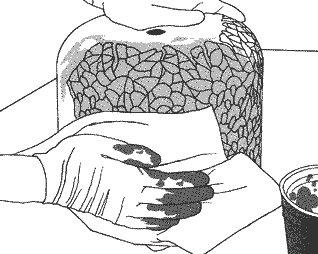
Removing the Excess Grout
correct. Smear the grout over the entire surface of the mold with your fingers, taking care to see that you work it into all the engraved lines. Then use dry paper towels or rags to clean off the excess. Don't expect to get it all off in one wiping. Go over the entire mold with one set of towels and again with a clean set. This should remove the vast majority of it, leaving only a thin gray film. If you want your mold white again, wait an hour or so until the grout begins to set up and go over it again with a rag that is only slightly damp. If the rag is too wet, it will begin to drag grout out of the grooves. After drying the grayness can be completely removed with sandpaper if desired.
Use 280 to 400 grit only, as anything coarser will unduly scratch the mold. After grouting, give the mold at least a day to dry out before coating it with wax. Do not apply Tacky Wax™ to the mold until you are ready to fit your lamp. The wax will stay tacky indefinitely, but if left exposed for any period of time, it will tend to attract dust and oils from the air, eventually affecting its adhesive properties.
Continued in Section 2
Skip to Section 3
