Click on any image to see a larger view.
T349
10" PONY WISTERIA
Installing the Crown
The Odyssey crown for this mold kit was copied directly from an original Tiffany shade. Because of the thinness of the casting and the normal stresses attendant to foundrying and machining, it tends to come out a little distorted around the edges. Our Odyssey staff could correct these distortions in our workshop before the crown is sent out, but that would add significantly to the already high price we have to charge. We determined that the variations were minor enough and the fix easy enough to just leave it to you.
Thus, before you attempt to install our crown in the shade and, in fact, even before you fit any glass on the mold, the crown needs to be fit to the mold. The crown should follow the contour of the mold all the way around and any "misdirected" branches bent into the correct position with a pair of pliers. Remember that, when installed, the crown will sit about 3/16" above the surface of the mold to leave space for the glass tiles to fit underneath- meaning that the ends of the branches should spread a little more than when they are sitting directly against the mold. To see what we mean, use some balls of Tacky Wax to raise the crown up above the mold 3/16" and see how the branches follow the contour around the curve of the shoulder. They should more-or-less maintain that 3/16" clearance.
When the crown is in place, you will notice that the branches do not line up exactly with the lines engraved in the mold. This is partially due to the imprecision of the manufacturing process, but mostly it's the result of the fact that Tiffany's original pattern for the casting does not repeat exactly through the three repeats of the design! Not to worry! First, rotate the crown through the three repeats to find the position that most closely follows the pattern lines engraved on the mold. Second, when you cut the glass tiles for the pattern pieces at the top of the design, cut them oversize at least 1/4" at the top or side that abuts the crown. That will give you material to custom shape the pieces abutting the crown as you fit them on the mold.
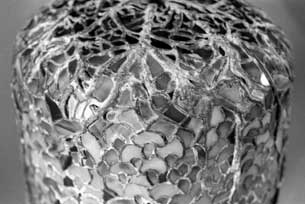
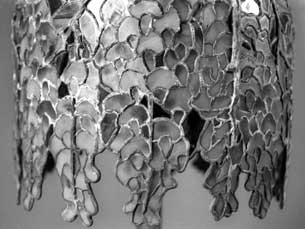
For those of you that are bothered by our imprecision, it's helpful to know that Tiffany's workers faced this same problem when they were cutting glass for this model. In the dozen-or-so examples that we referenced in arriving at the Odyssey pattern, there was no consistency at all in the arrangement of the glass tiles in and around the crown. The images of two original Tiffany Pony Wisterias below clearly demonstrate this disparity.

It is evident that the Tiffany girls made up their own on-the-fly patterns for this area as they fit the shade on the mold and you will have to do the same. (The same is true for the larger T342 Wisteria.) On the Odyssey pattern supplied with this mold kit, we patterned this area by combining the best layouts from a number of examples. So nothing is written in stone here and you can pretty much do whatever strikes your fancy. In the images above, you will also notice that the arrangement of the pendant tips varies somewhat. It is apparent that the pieces were all cut to a definite pattern, but considerable "artistic license" was taken when they were positioned on the mold.
FITTING
 It is probably a good idea to have the crown positioned on the mold when you begin the fitting step. This means that it should already be raised up the 3/16" with balls of Tacky Wax. As you proceed with fitting and begin to trim and position the glass tiles that abut the crown, they should be sized so that the glass extends under the crown a distance roughly equal to your foil overlap. This will cause the solder contour to go straight down from the edge of the crown to the glass surface, thereby insuring that the branches will finally appear crisp and well defined. You don't need to be too exacting here. Just be aware that, once soldered in, the appearance of the branches will be defined more by the foil edge than by the actual contour of the casting.
Viewing the images on this page, you might have noticed that Tiffany usually extended the branches beyond the crown and sometimes added additional branch elements further down in the curtain area of the shade. From viewing a lot of original shades, we know that these elements were defined by and enhanced with nothing more than short lengths of wire of strips of lead. Sometimes they appear to be nothing more than built-up solder. (They were also sometimes later embellished with file marks or chisel lines to further enhance their branch-like appearance.) In any case, if you want to add in these elements, they are best worked in as you fit the shade. You can leave a small gap between pieces or simply add an extra wide foil overlap along the planned route. Either way, the edge of the foil and not any gaps or overlays is what will define the final appearance of the added branch.
On a final note, special care should be taken in removing the shade from the mold. The attachment of the pendant branches is tenuous at this point and they can easily break loose during the removal operation. For this reason, we recommend that our 14 guage rim wire be soldered in place BEFORE the shade is released from the mold. This should be secured all the way around the entire rim in one continuous run without cutting the wire anywhere. On those tight angles at the tops of the pendants, just bend the wire to as tight a curve as you can; that's the way Tiffany did it. This continuous wire is crucial in maintaining the integrity of the lower edge of the shade.
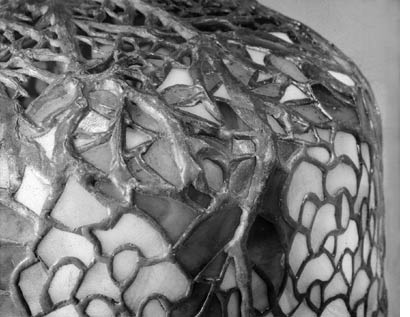
We have added a couple of images of another original Tiffany Pony Wisteria below. They are not the best source of information because corrosion has left a chalky white deposit on the leading that partially obscures the surface detail. We include them anyway for whatever help they may be of to you.