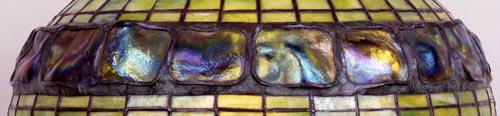
Turtlebacks installed in an original Tiffany Shade
T1434
16 TURTLEBACK BAND
Supplies Needed
 Odyssey TB1434 Turtleback Set
60 12 gauge copper wire (our RW1)
Approx. 14 ft. 1/8 U lead came
A diamond band saw
Tiffany's turtleback tiles were pressed from iron molds and iridized while still hot. The Studios produced them in several sizes, shapes and colors, but the most common style and the one which they usually employed in the leaded shades is a large ovoid shape, approximately 6 x 4¾. This turtleback was seldom installed whole and more often used as the source material to form smaller rectangular shapes that make up the bands around the circumferences of a family of Tiffany shade designs. Each piece was cut at random from a different area of the turtleback, so that it transmitted the light in a unique way and gave the shade a very hand-made look.
Tiffany always wrapped his turtleback tiles with lead came rather than copper foil. He probably did this because the lead came had more "give" to it and was thus better able to absorb the stresses from heat and other abuses that the thick and fragile glass mass was subject to. Because the edges of these raw sections could be up to a half inch thick, they had to be heavily chipped or "knapped" to fit into the came, a difficult procedure that required a lot of skill and patience. Odyssey has avoided this problem by providing the craftsperson with almost-ready-to-fit tiles for our T1434 mold. These tiles, Product #TB1434, are made in the correct shape and have a thin edge all the way around. We have copied them directly from originals, so they look authentic—with a highly irregular back surface and even facsimiles of the big "knap" marks around the edges. Our tiles come in four separate pressings, each of which refracts the light a little differently, to give them that random look of Tiffany.
You will notice that our tiles do not fit flush against the mold, meaning that the "foil edge" sits above the mold surface and cannot be joined to other regular glass pieces around it. For this reason the tiles must be installed in the shade after it is pulled from the mold . This creates an obvious problem that is solved as follows:
Cut all of the regular flat glass tiles and fit, foil and tack-solder them onto the mold in the regular manner. Be sure that these geometric tiles do not protrude into the space reserved for the turtlebacks. You can bead the outside while the shade is still on the mold if you prefer, but, if you don't, take care to see that the tack-soldering penetrates enough to hold the shade securely together.
You will see that the shade is now in two sections, an upper "cap" and a "ring" around the bottom. You will join these sections together with 18 short lengths of copper wire that bridge the gap all the way around the shade. The wires, which should be at least 14 gauge thick (Odyssey's reinforcement wire #RW1 is good for this) and about 3 long, are soldered at both ends onto every other vertical lead line around the mold. There are 36 vertical lead lines that abut the gap, so you need 18 wires. Once the wires are soldered securely in place, you can remove the shade from the mold.
As soon as the shade is off the mold, install the ring to give you something to hold on to. Be sure to level it as outlined in the Instruction Manual. The rim can also be installed at this point, but we prefer to get the turtlebacks in first.
The turtleback tiles come in four-piece patties. These must be cut apart along the edge line that is visible around each tile. We strongly recommend that this be done with a diamond band saw, to avoid losses. Once the tiles are separated, wrap each one tightly with 1/8 U lead came and join the butted together ends with a little solder. (Not that it really matters, but Tiffany seems to have always positioned the butt joint at the center bottom of the tile.) Use a lathkin to be sure the lead is flush up against the glass and there are no light leaks.
Next, remove one of the spanning wires and position the tile in the center of the created gap. The camed edge is not exactly level, but position it as best you can to meet flush on both top and bottom. Also, check to see that it is centered between the vertical lead lines on both sides. Now tack it in place at the points in the center, top and bottom, where the vertical lead line intersects it. Remove an adjacent wire and repeat the procedure. There may be a small gap between the turtlebacks, but don't worry about this. The lead lines are supposed to be heavy and in Tiffany's they often approached 3/8 wide. On the other hand, the turtlebacks shouldn't be so wide that they push each other beyond the lead lines on the side. If they do, they've been cut too big and you're going to run out of room as you move around the shade. For all turtlebacks beyond the first one, tack them to the adjacent turtleback as well as to the top and bottom. Repeat this process all the way around the shade.
After all of the turtlebacks are installed, you can fill the gaps in with solder. Remember that the lead came melts at a fairly low temperature. If you're a copper-foil partisan and haven't worked with came in a while, it's probably a good idea to practice a bit before putting a hot iron on your shade. Tiffany did not "bead" the lead came around his turtlebacks in the usual sense. He just filled in the gaps to a smooth concave surface that left the edge of the came clearly visible. The rest of the shade is finish soldered in the regular manner.
A final note regarding plating and iridized glass: The lead came around turtlebacks in original Tiffany shades is not patinated like the rest of the shade, but rather painted a kind of dark avocado green color. There is a practical reason for this curious anomoly. Copper-plating the lead around the turtlebacks often results in the plating "spilling over" onto the turtlebacks themselves, because their iridescent surface happens to be conductive and also takes the plating quite nicely. Plating on turtlebacks is a disaster. It is opaque and so adherent that it does not come off easily. When you are able to peel it off, the iridescent coating comes off with it! To get around this problem, it appears that Tiffany plated these shades before the turtlebacks were installed, i.e., while whatever bridging system he used was still in place. This allowed him to get a nice patina on the regular part of the shade and then paint the came surfaces around the turtlebacks. It is hoped that this little anecdote will serve as a warning to anyone who is considering copper-plating a shade that contains iridized glass.