T422
15 LOTUS BELL
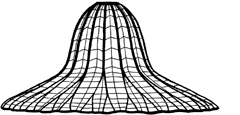
Those of you that have seen a real lotus leaf will appreciate how closely Tiffany followed nature in designing his family of lotus lampshades. One should assemble the 15 Lotus Bell shade with this in mind, taking care that the regular organic feel of the natural leaf is reflected in your lampshade. Specifically, this means the following:
![]() The lower edge of the shade should be slightly irregular, varying about ¼" in and out around the circumference. By irregular, we do not mean in regular synchronization with the ridges and gutters, but entirely random, like in nature. (With our organized brains, this is harder to do than one might expect.) The Odyssey T422 pattern shows a dashed line on the pieces along the lower edge of the shade to give you an idea of the upper limit of the irregular edge. The glass should all be cut to the regular heavy line first, and the trimming to create the irregular edge done only after the shade is completely cut and laid out flat.
The lower edge of the shade should be slightly irregular, varying about ¼" in and out around the circumference. By irregular, we do not mean in regular synchronization with the ridges and gutters, but entirely random, like in nature. (With our organized brains, this is harder to do than one might expect.) The Odyssey T422 pattern shows a dashed line on the pieces along the lower edge of the shade to give you an idea of the upper limit of the irregular edge. The glass should all be cut to the regular heavy line first, and the trimming to create the irregular edge done only after the shade is completely cut and laid out flat.
![]() When fitting the glass on the mold, be sure all of the tiles in a column down the shade are positioned so as to form a fairly smooth surface, i.e., one that doesn't appear to buckle.
When fitting the glass on the mold, be sure all of the tiles in a column down the shade are positioned so as to form a fairly smooth surface, i.e., one that doesn't appear to buckle.
![]() After foiling, be sure the edges of the foil down the ridges and gutters form a fairly smooth line, so that when the solder bead is finished, it doesn't get thick, then thin, or angle from side to side. Do not adjust the foil width to widen the lead line in the gutters or narrow the lead line on the ridges. The gutter line is supposed to be very narrow, and the ridge line wide.
After foiling, be sure the edges of the foil down the ridges and gutters form a fairly smooth line, so that when the solder bead is finished, it doesn't get thick, then thin, or angle from side to side. Do not adjust the foil width to widen the lead line in the gutters or narrow the lead line on the ridges. The gutter line is supposed to be very narrow, and the ridge line wide.
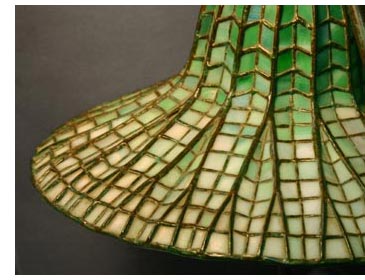
![]() All of the ridges on the outside of this shade are crowned by thin wires to accentuate the veining of the leaf. The Odyssey RW422 Hardware Kit includes the correct wire for this purpose, which is springy but still bendable, so that it will remain smooth and straight when applied to the shade. The placement of the wires is illustrated in the accompanying drawing. Regular wire cutting pliers, without worn-out tips, will cut this wire easily. The upper end is simply butted up against the ring (which should be set in the shade high enough so that its top is flush with the tops of the wires) and the lower end cut at the rim wire. Before applying the wire fill but do not bead the ridge lead lines, meaning that the solder should fill the big gap between the glass tiles to the point where there is a flat, uniform surface, but no higher. When beading the wire, do not overfill with solder. The solder surface should be concave on both sides of the wire, so that the wires (veins) stand out. The soft 14 guage copper wire is installed along the rim as instructed in the Odyssey Instruction Manual. Generally, some filing is required along the bottom rim after the shade is soldered to smooth the transition from the wire ends to the rim.
All of the ridges on the outside of this shade are crowned by thin wires to accentuate the veining of the leaf. The Odyssey RW422 Hardware Kit includes the correct wire for this purpose, which is springy but still bendable, so that it will remain smooth and straight when applied to the shade. The placement of the wires is illustrated in the accompanying drawing. Regular wire cutting pliers, without worn-out tips, will cut this wire easily. The upper end is simply butted up against the ring (which should be set in the shade high enough so that its top is flush with the tops of the wires) and the lower end cut at the rim wire. Before applying the wire fill but do not bead the ridge lead lines, meaning that the solder should fill the big gap between the glass tiles to the point where there is a flat, uniform surface, but no higher. When beading the wire, do not overfill with solder. The solder surface should be concave on both sides of the wire, so that the wires (veins) stand out. The soft 14 guage copper wire is installed along the rim as instructed in the Odyssey Instruction Manual. Generally, some filing is required along the bottom rim after the shade is soldered to smooth the transition from the wire ends to the rim.