L1000
PATTERN LINEN
The pattern linen you have purchased from Odyssey is old drawing material originally used by the drafting industry to make finished architectural renderings. It was manufactured from finely woven Irish linen that is sized with starch to give it body and provide a smooth drawing surface. We discovered that this material is ideal for drawing patterns on the curved surface of a lamp mold. When the material is wet, the starch sizing softens allowing the fabric to stretch somewhat, so that it can be laid down smoothly over a curved surface. When dry, the linen stiffens up again and is durable enough to withstand the repeated drawing and erasing that is attendant to designing a new pattern. Because the wet material can stretch flat only through a limited arc of curvature, it is usually necessary to divide the pattern surface into a number of pieces of linen, creating a sort of patchwork quilt arrangement. Fortunately, we have found that, when the individual patches of linen are overlapped onto one another a little, the whole thing adheres together quite nicely when dry. As a result, the linen surface can be peeled from the mold in a single piece that perfectly matches the curve of the mold. These properties make it ideal for designing copper-foiled lampshade patterns.
Unfortunately, architectural linen is no longer manufactured in the same form. (It was gradually replaced in the 60s by modern plastic sheets- Mylar, etal.) Fortunately, Odyssey has been successful so far in ferreting out old stocks of starched linen, and we are pleased to offer it as a service to our customers. However, because we are dependent on what is available, the sizes that we carry in stock change periodically. Also, we must anticipate that, at some point in the future, our sources will dry up and this wonderful old linen will become as extinct as the dinosaurs.
DIRECTIONS:
Odyssey's Pattern Linen can be used on any smooth, non-porous surface. Absorptive surfaces, such as raw wood or plaster molds, should be coated with a water-resistant layer of wax or shellac to prevent excessive sticking of the linen to the mold. On the other hand, smooth, glassy' surfaces, such as those on the Odyssey molds that are hghly polished, may cause the linen to release from the mold surface prematurely as it dries. In such cases, the surface should be roughed up' first with very fine sandpaper to provide some tooth to help the linen adhere.
Prudent designers almost always opt for a design that repeats around the mold, so that they don't wind up with a zillion pattern pieces that have to be cut out and kept track of. Another benefit of this approach is that you don't have to apply linen to the whole surface of the mold. After determining the number of repeats that you want, use a seamstress' tape to approximate the width of one repeat and draw two straight radial lines from top to bottom on the mold with a dark felt marker. These lines will show through the linen, giving you a guide to what part of the surface you need to cover. (They can be removed later with solvent.) To accommodate the irregular edges of the actual pattern design, the material should extend beyond the radial lines on both sides- at least one inch each way for small piece patterns and two inches for larger piece patterns. (This is a minimum, but even more is better for working out the pattern.)
The linen is applied to the mold wet. For wetting the linen, we recommend a shallow bowl with a flat bottom, at least 10 in diameter, filled to a depth of about 1 with warm tap water. It is also recommended that you add about one teaspoon of white school glue (Elmer's, Wilhold, etc.) per pint of water to aid in surface durability and adhesion. The linen segments are immersed in the water/glue solution for as long as it takes them to become pliable (20-30 seconds) and then immediately transferred to the mold sopping wet. We have found that, if you leave them in the water too long, they become fully limp and are difficult to handle and position correctly on the mold. As the pliable segments are being laid out on the mold, the excess wetness will continue to soften them until they spread out smoothly over the surface.
The flexibility of the wet linen allows it to conform to a spherical surface (i.e., curving in both directions) through about 15 ° of curvature in both directions. Since virtually all patterns on spherical surfaces span more than 15 ° , the linen must be divided up into a number of segments to span the whole pattern surface. If the surface (or part of the surface) is curved in only one direction, such as a cone or cylinder, it does not have to be divided up and the linen segments can be as large as your material allows. There are no set guidelines as to the size and shape of linen segments, since these parameters are affected largely by the particular nature of the surface, as well as the size and shape of the material available. After all, when the linen is dry, you won't even notice how many segments it's composed of; it only affects how much work it took you to get there!
All linen segments should overlap each other about ¼ on the mold to insure that they stick together securely. The linen is cut apart with scissors and this can only be accomplished while it is still dry. Don't even think about trying to cut wet linen because, even with a very sharp pair of scissors, it leaves an unacceptably ragged edge: it just doesn't work. For this reason, the segments must be cut first, then wet and placed on the mold one at a time . This is reasonable because you never know how a segment will distort when it is stretched out flat on the mold. Only after the first segment is in place can you accurately determine how to shape the adjoining edge of the next segment. Thus, they are done one at a time until the whole surface is covered. As the linen is being laid out, bubbles inevitably form under its surface and these should be squeegeed out to the edge with your fingers as you go along. While working on the surface, keep the linen quite wet, as this will make the smoothing and minor adjustments easier. 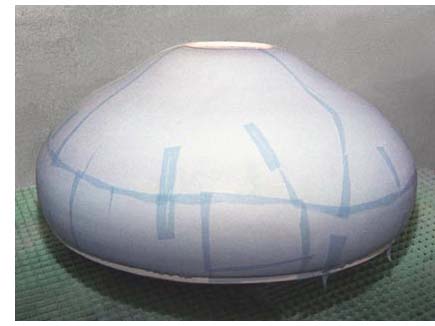
In practice, we try to keep the segments as large as possible. To stretch their range, we often slit the edges (about 1 into the segment, perpendicular to the edge) so that the two flaps created by the slit overlap each other when the linen is flattened out on the mold. Stretching often results in a gap in the crotch of the slit, which should be covered over with a separate linen strip about ½ wide. Such darting is especially useful around sharper curves, such as the shoulder at the bottom of most Odyssey cones. This may all sound confusing at first reading, but, after doing it a few times, we trust that these instructions will make perfect sense. If they still don't, call us.
After all of the segments are in place and the surface completely covered, pat up all of the excess water with a damp sponge or paper towel. Don't rub it, just pat. At this point, the mold is left to dry in a warm place, which usually takes from two to four hours. The last areas to dry will be the overlaps and these should be completely white before you start drawing. At this point, we usually trim off the excess linen at both the ring and rim ledges with a single-edged razor blade.
DRAWING THE PATTERN:
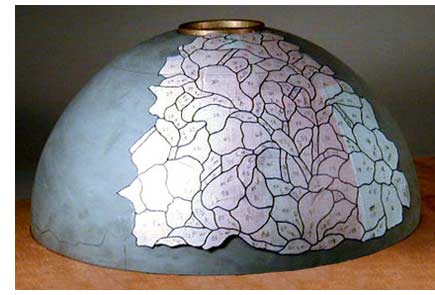
Being able to create an accurate working pattern on the mold is your goal in this long process, so, If you intend to do a repeating pattern, we cannot stress enough the importance of first establishing an accurate geometric grid on the mold before you begin working on the design. Impatient designers all too often cannot resist the lure of a blank drawing surface, and opt to put off the boring work of geometry until sometime "later." This procrastination usually leads to scale and positioning issues when the grid is finally laid on at the end and hasty compromises inevitably result in fitting problems down the road. Save yourself a lot of grief and do it now.
For drawing on the linen, we recommend a soft pencil (we prefer F, but at least 2H) and an ordinary Pink Pearl eraser. The linen surface can be penciled on and erased as many times as the creative mind changes (well, almost). When erasing lines drawn on top of an overlapped seam, try to erase in the direction of the seam rather than perpendicular to it. Erasing perpendicular puts stress on the seam and may cause peeling of the upper layer.
 Begin setting up your grid by finding the center point at the top of the mold. Measure across the ring depression and make a pencil mark at the half-way point, then do the same at 90° to locate the actual center point. Repeat these steps at 45° and 135° to check yourself.
With the center point established, determine the true circumference of the mold using a seamstress' tape to measure around the bottom just above the rim ledge (or about 1" above the bottom edge for molds without rim ledges and at the widest diameter for tuck-under molds).
After the design is finalized, it is a good idea to go over the lines with a dark felt-tipped pen to make them permanent.
Have fun!